
February 2, 2026
.webp)
How to Draw a Person a Practical Guide for Artists
Learn how to draw a person with this practical guide. Master proportions, gesture, and anatomy to create realistic figure drawings and character art.
Practical Skills
minutes
Drawing a person can feel intimidating, but the secret isn't in the tiny details—it's in the blueprint. Before you even think about eyes or hands, getting the basic proportions right is what makes a figure look believable. This foundational skill breaks down a complex subject into simple, manageable steps.
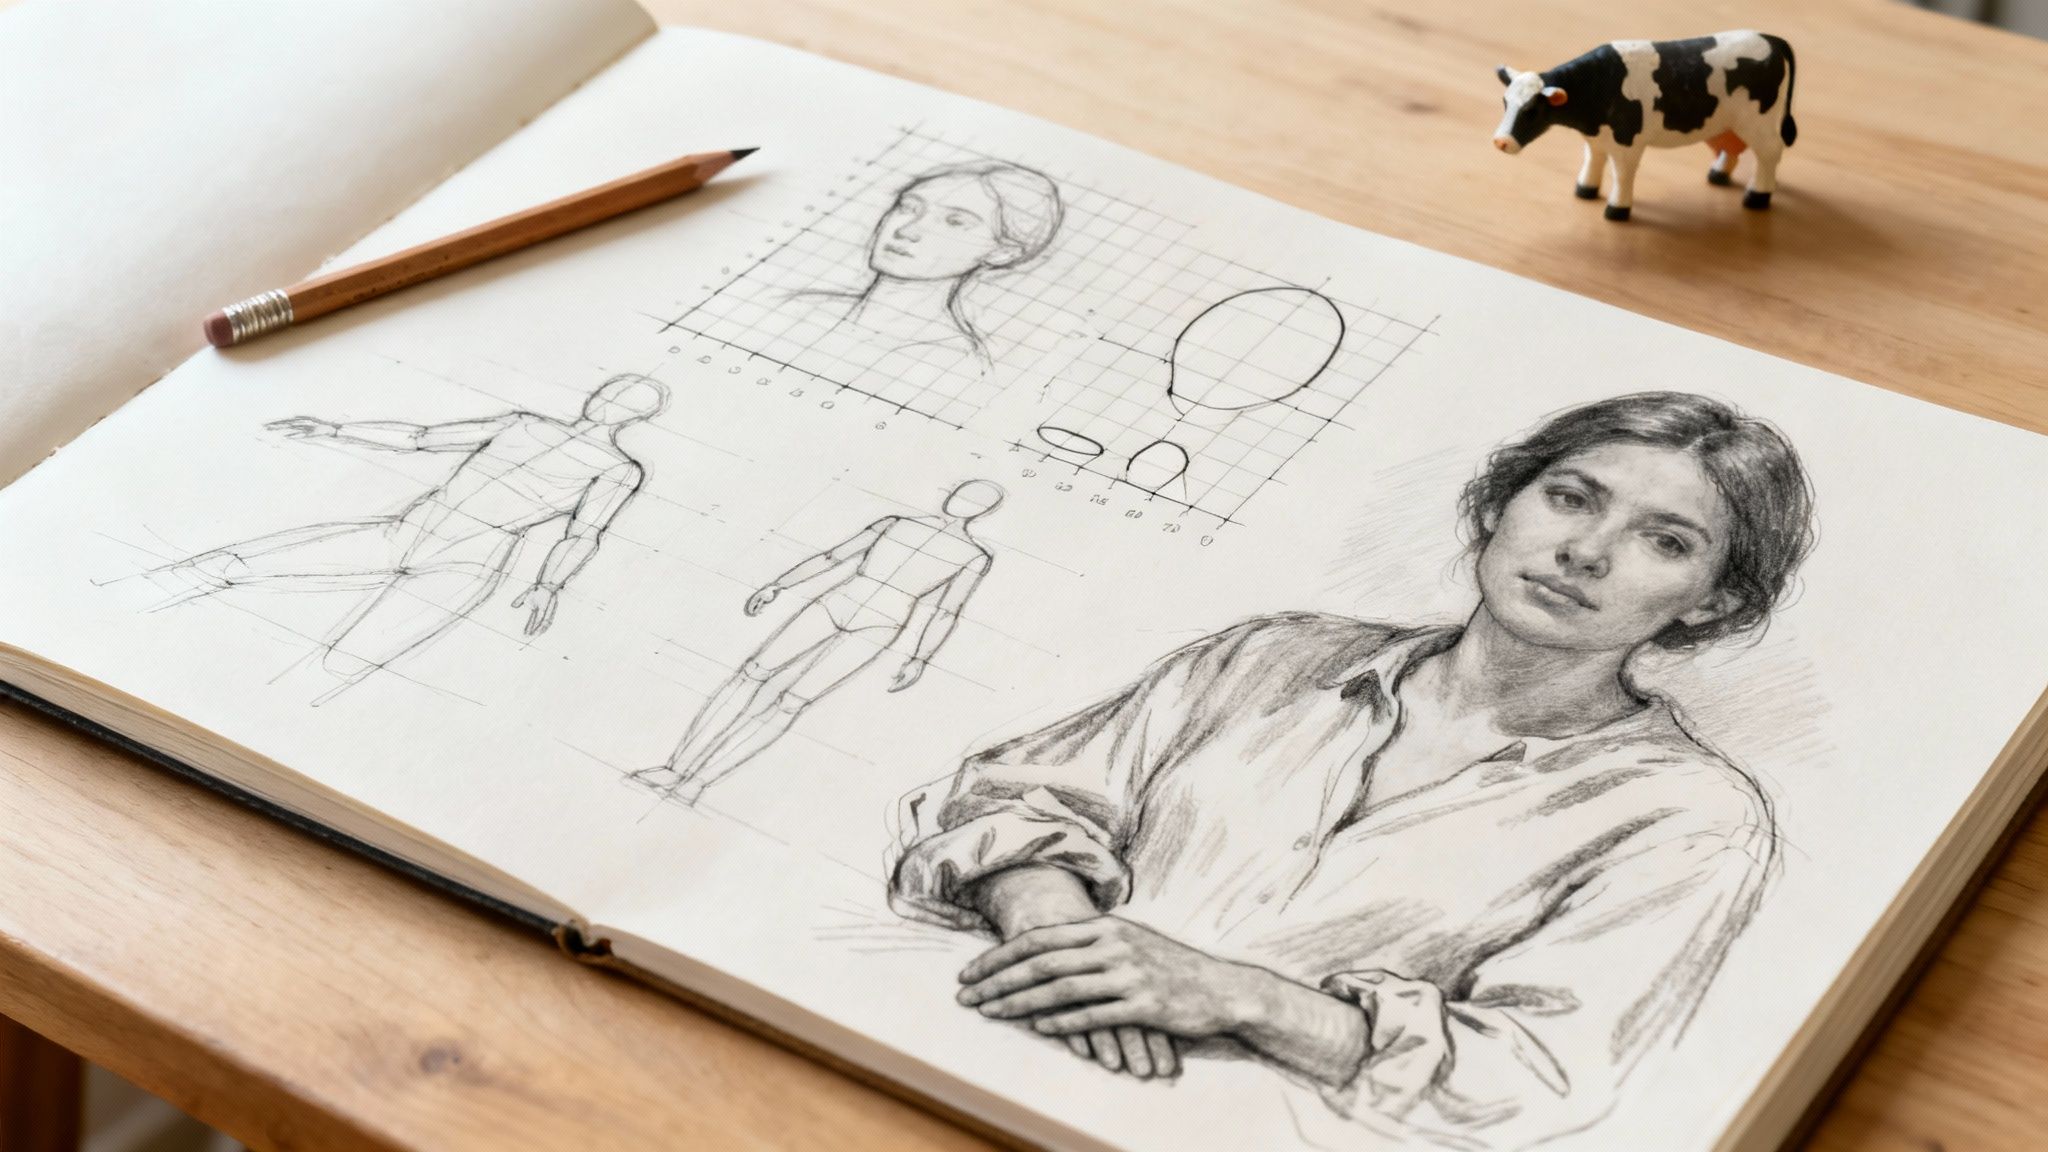
Mastering the Blueprint of the Human Form

Before adding a single detail, the real magic behind a realistic figure drawing lies in its proportions. Think of it as the framework that holds everything together, ensuring all the parts look balanced and correct. Without this solid structure, even beautifully drawn features can feel awkward or out of place.
It's best to see this stage not as a rigid set of rules, but as a flexible guide. Once you get the hang of the standard measurements, you can tweak them to draw people of all shapes and sizes—from someone slouched over a coffee to a dynamic character leaping into action. This blueprint is your starting point for every single figure you create.
The Head Count Method Explained
The classic "head count" method is a tried-and-true technique artists have relied on for centuries to map out the body. It’s wonderfully simple: you use the height of the head as a basic unit of measurement to plot key landmarks on the figure. On average, a typical adult is 7.5 to 8 heads tall.
Using this system helps you dodge common mistakes like making heads too big or legs too short. It provides a consistent way to check your work and build a balanced figure from the ground up.
Here are the key ratios to keep in mind:
- The Torso: Measures roughly 3 heads long, from the top of the skull down to the hips.
- The Legs: Are about 4 heads long, making up roughly half the body's total height.
- The Arms: When hanging naturally, the fingertips should reach about mid-thigh.
To make it even easier, here’s a quick reference table.
A Quick Guide to Standard Human Proportions
This table breaks down the 'head count' method into key landmarks, giving you a quick reference for mapping out your figures.
Remember, these are just guidelines! People come in all shapes and sizes, so feel free to adjust these to fit the character you're drawing.
Why Proportions Are Crucial for Kiwi Creatives
Knowing how to draw people is a skill that’s becoming incredibly valuable in New Zealand's creative scene. While domestic tertiary enrolments in creative arts have shifted, savvy Kiwis are adapting by seeking out practical, focused learning online. This highlights a growing demand for drawing courses that fit into a modern NZ lifestyle.
Learning to draw people isn't just an artistic hobby; it’s a genuinely practical skill. For a Kiwi farmer sketching out a new marketing idea or a small business owner in Wellington designing a website, being able to draw a relatable human figure can make their work more personal and effective.
This skill lets you illustrate people in uniquely New Zealand contexts, whether it's a character in a rural setting or figures representing local industries. You can build on these abilities through various creative arts courses designed to fit into a busy schedule.
As you get comfortable with the human blueprint, looking at resources that show anatomical bone structures can be a game-changer. Understanding the skeleton beneath the skin gives you a much deeper insight into why the body's proportions work the way they do. This knowledge transforms your drawings from copies into convincing, three-dimensional forms, because you start to grasp the mechanics of movement and posture.
Capturing Life and Movement with Gesture
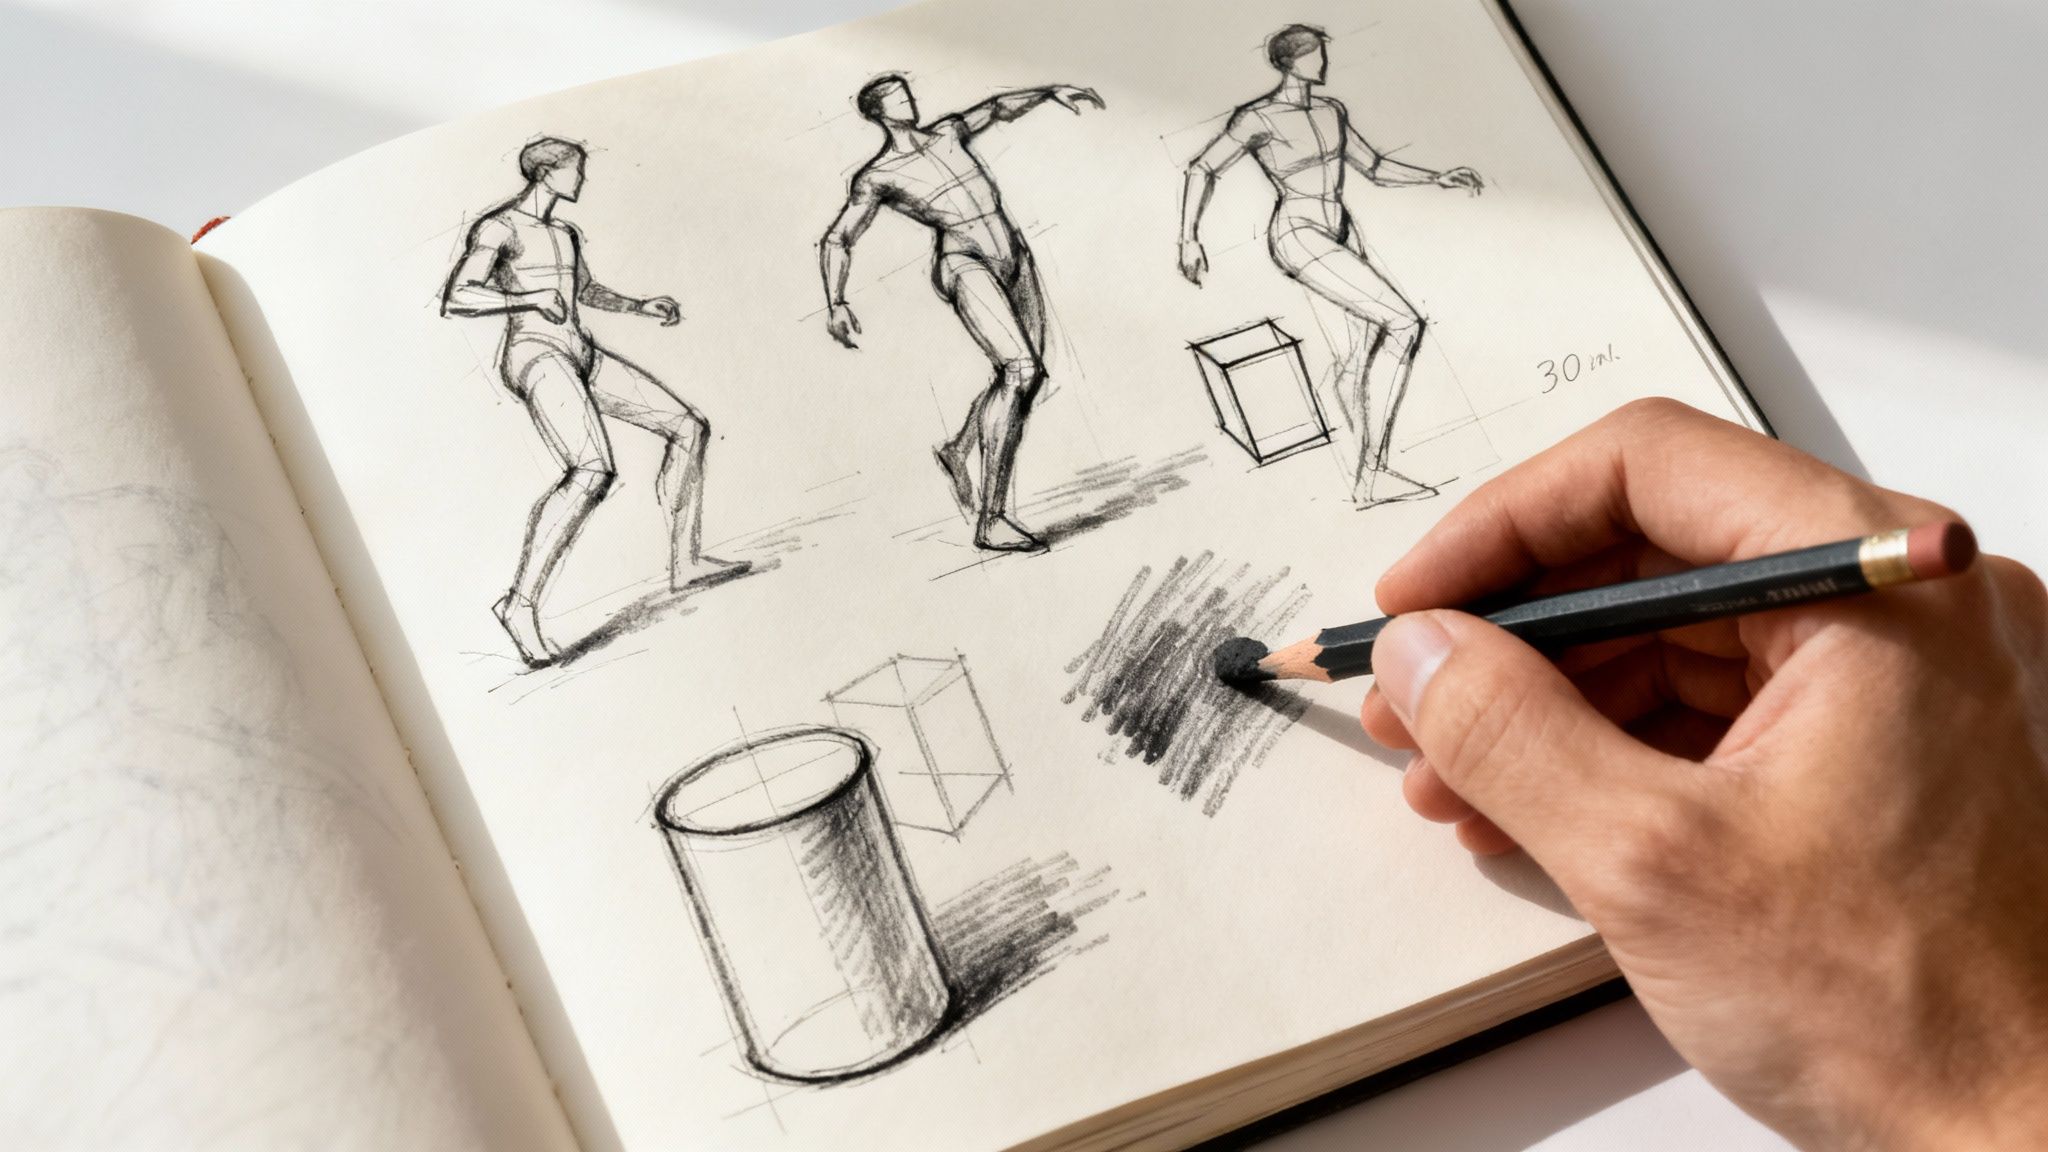
Once you've got a handle on the blueprint of proportions, it’s time to breathe some life into your work. This is where gesture drawing comes in—it’s the secret sauce for moving beyond stiff, wooden figures and capturing the dynamic energy of a real person.
Gesture drawing isn't really about perfect anatomy. It's all about the flow, the weight, and the feeling of a pose. Think of it as the emotional core of your sketch. A single, sweeping line can communicate whether someone is leaning casually, sprinting full-tilt, or slumping in defeat.
Getting good at this trains your hand and eye to see movement first, which is the key to drawing people who feel genuinely alive on the page.
Simplifying the Body Into Basic Shapes
To nail gesture, you can’t get bogged down in the fiddly details of anatomy. Not yet, anyway. The trick is to simplify the human form into basic, three-dimensional shapes that you can sketch out in seconds. It makes the whole process far less intimidating.
Forget about individual muscles for a moment. Instead, think in terms of these core building blocks:
- The Head: Start with a simple oval or sphere.
- The Torso: I like to think of this as a rectangular box, or even two connected ovals—one for the ribcage, one for the pelvis.
- The Limbs: Cylinders are your best friend here. Use them for the arms and legs, bending them where the joints would be.
Breaking the body down this way lets you build a convincing 3D form without needing a medical textbook. It frees you up to focus purely on the pose and its energy.
The Power of the Line of Action
At the heart of every great gesture drawing is the line of action. This is a single, expressive curve that runs through the figure, from the head right down to the feet, capturing the main thrust of the pose. It should be the very first line you put on the paper.
Picture a cricketer just about to bowl or a dancer mid-leap. The line of action is that fluid arc defining the entire movement. Starting with this line forces you to see the figure as one connected system, which is a fantastic way to stop your drawings from looking disjointed.
Gesture drawing isn't about creating a finished masterpiece in seconds. It's a training exercise that teaches your brain to prioritise movement and energy over static outlines. This shift in thinking is what separates a lively sketch from a lifeless copy.
This technique helps you understand how different poses affect the body's overall shape. As you explore movement, you might find it useful to learn more about how different camera angles and shots can frame a subject, which can spark new ideas for your figure drawings.
Quick Gesture Drawing Exercises
The best way to get better is through fast, repetitive practice. Set a timer and get drawing. These quick-fire drills are designed to sharpen your observation skills and build that all-important muscle memory, training you to capture the essence of a pose almost instinctively.
Try these exercises using photos or videos of people in motion:
- 30-Second Sketches: The only goal here is speed, not accuracy. Just focus on the line of action and the most basic shapes. Don't even think about details—just capture the flow.
- 60-Second Sketches: With a bit more time, you can add a little more form. Start to define that torso box and the limb cylinders, paying attention to how they overlap to create a sense of depth.
- Two-Minute Sketches: Now you can bring in a bit more structure. Hint at the placement of the head, the angle of the shoulders, and the tilt of the hips. But keep those lines loose and energetic.
This isn't about drawing a perfect person every time. The real win is training your eye to see the bigger picture—the rhythm, the balance, and the story within the pose. Consistent practice will make your drawings feel more natural and dynamic, giving you a strong foundation to build on when you're ready to add the finer details.
Drawing Expressive Faces and Hands
Once you've captured the gesture and energy of a pose, the real storytelling begins with the face and hands. These are easily the most expressive parts of the body, and getting them right can elevate a simple sketch into something that genuinely connects with people.
They might look intimidatingly complex, but both the head and hands can be broken down into simple, manageable shapes. Getting a handle on these smaller structures is a huge leap forward. Let's walk through how to construct the head and tackle the notorious challenge of drawing hands.
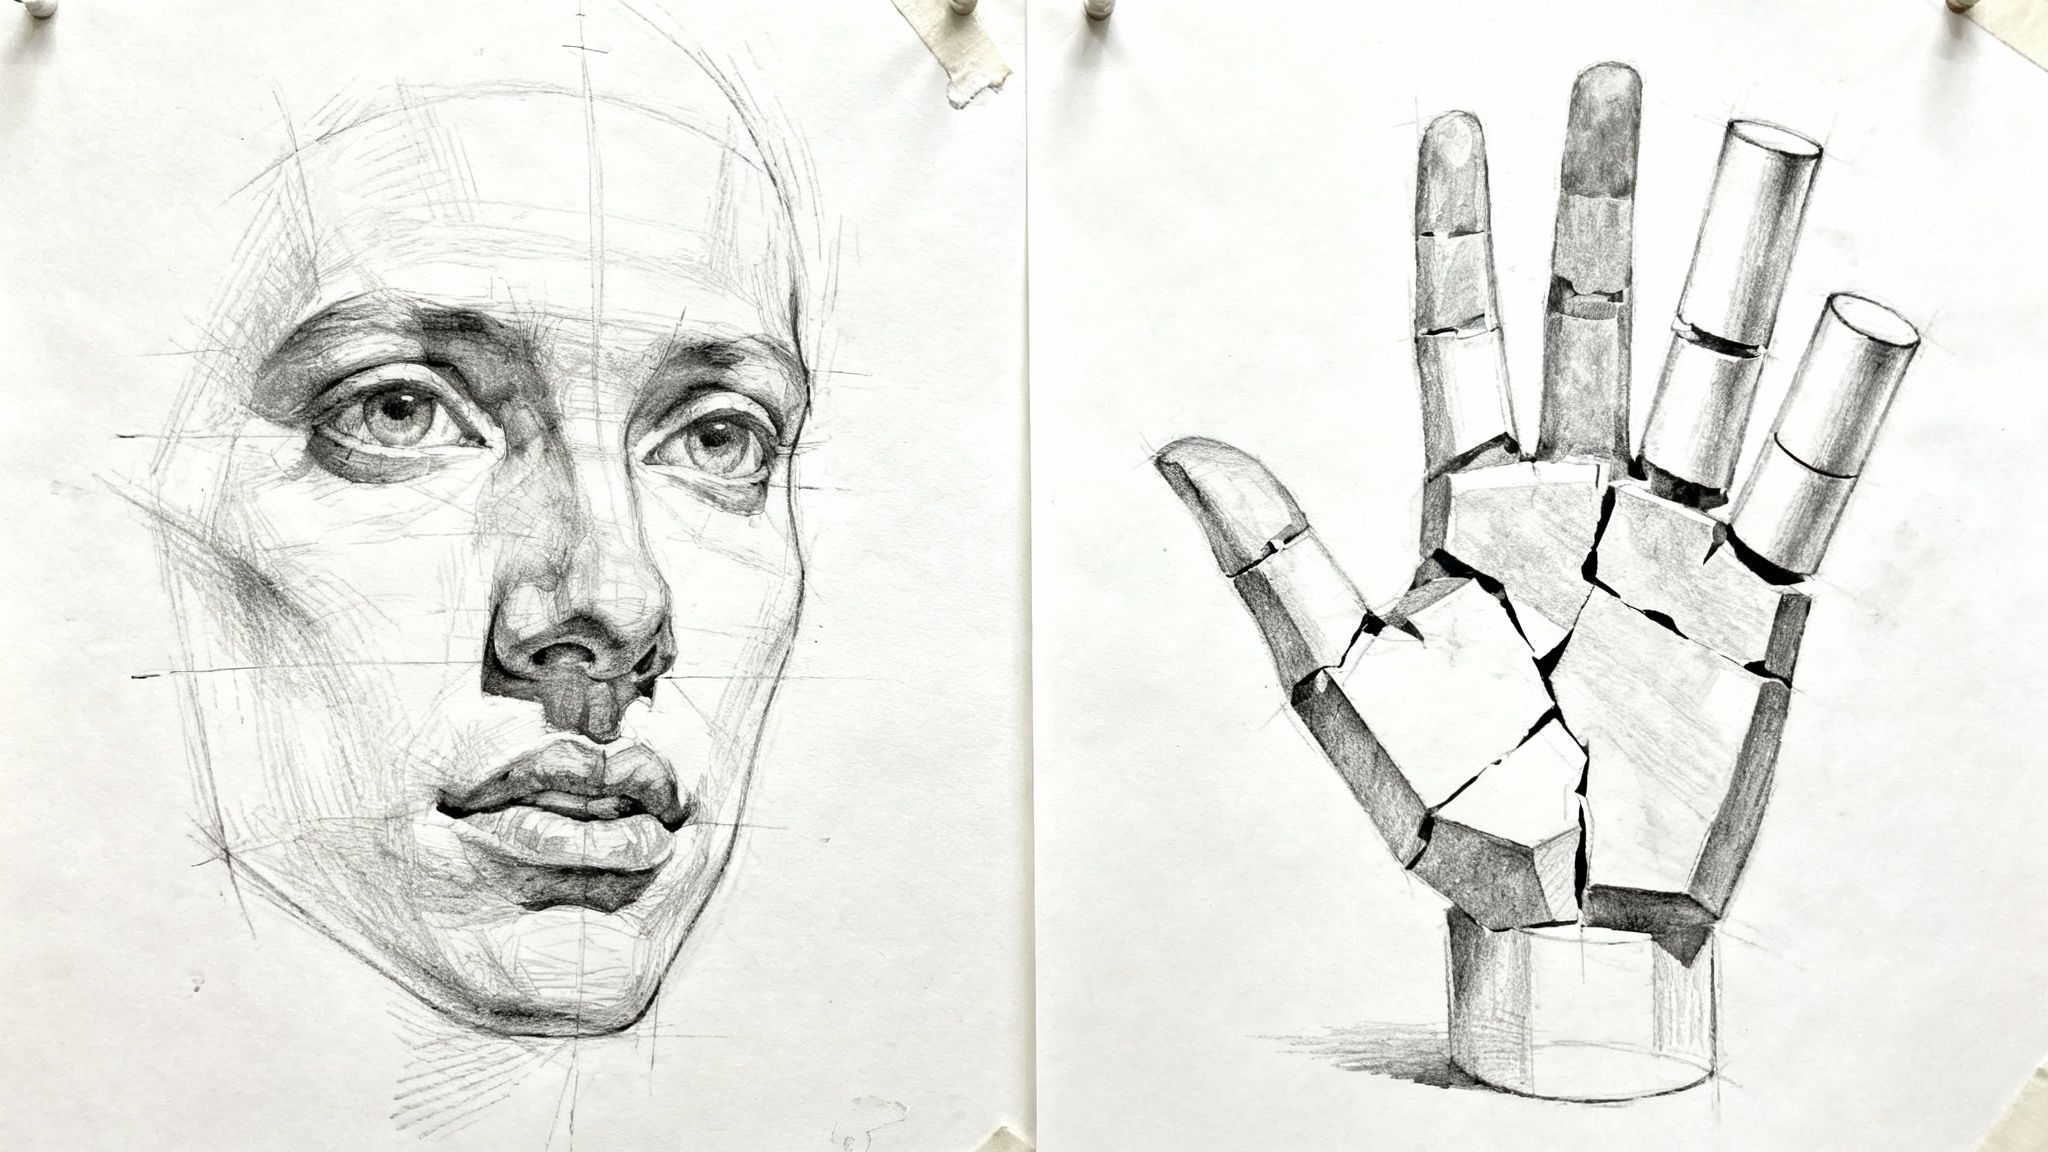
Building the Human Head with Simple Guidelines
A classic beginner mistake is drawing facial features that seem to just float on a flat oval. To get that convincing, three-dimensional form, you're much better off starting with a sphere and then attaching a jawline. Think of it like a sculptor starting with a block of clay; it gives you a solid foundation to build upon.
With your basic head shape sorted, you need a system for placing the features. The Loomis method is famous for a reason, but even a simplified version is incredibly effective when you're starting out.
- The Eye Line: Draw a horizontal line right across the middle of the head. This is where the eyes sit—a placement that's surprisingly low, and a common trip-up for new artists.
- The Nose Line: Find the halfway point between that eye line and the bottom of the chin. This marks where the base of the nose will be.
- The Mouth Line: Now, divide the remaining space between the nose line and the chin into thirds. The mouth rests on that top third.
These guidelines give you a reliable map for the face every single time, making sure your features are balanced and proportional from the get-go.
Think of these construction lines as a temporary scaffold. You draw them lightly to guide your placement, and they can be erased later. Their purpose is to build confidence and accuracy before you commit to darker, final lines.
This structured approach takes the guesswork out of the equation. It allows you to stop worrying about where things go and start focusing on the unique character of the face you're drawing.
Placing the Features Correctly
Now that your guidelines are in place, you can begin adding the features. Just remember, the head is a curved surface. Your features need to wrap around that curve, not just sit flat on the page.
A few extra pointers can make a world of difference here:
- Eye Spacing: The gap between the two eyes is typically the width of a single eye. This little rule is brilliant for stopping your eyes from being too close together or too far apart.
- Nose Width: The edges of the nostrils generally line up with the inner corners of the eyes.
- Mouth Width: The corners of the mouth usually align with the centre of each eye (the pupils).
Of course, these are just starting points. Everyone is different, and tweaking these markers is what will create a unique likeness. But starting with this solid framework ensures the fundamental structure is believable.
Tackling the Challenge of Drawing Hands
Ah, hands. They have a reputation for being tough to draw, but they don't have to be your nemesis. The secret is to stop seeing them as a tangled mess of fingers and knuckles and instead break them down into basic geometric forms.
Try thinking of the hand in two main parts:
- The Palm Block: Imagine the palm as a simple, slightly tapered square or rectangular block.
- The Finger Cylinders: Each finger can be simplified into three connected cylinders, with the thumb having just two.
Sketching these basic shapes first allows you to construct a hand in almost any pose. You can figure out the overall gesture and position of the fingers before you even think about details like fingernails or wrinkles. It’s a powerful way to make sure the hands in your drawing feel natural and connected, whether they're resting or holding something.
For instance, when drawing a hand gripping a tool, you'd start with the palm block and then wrap the finger cylinders around the object's shape. This ensures you get a convincing grip and proper perspective, making your drawings feel far more dynamic.
Adding Depth with Clothing and Shading
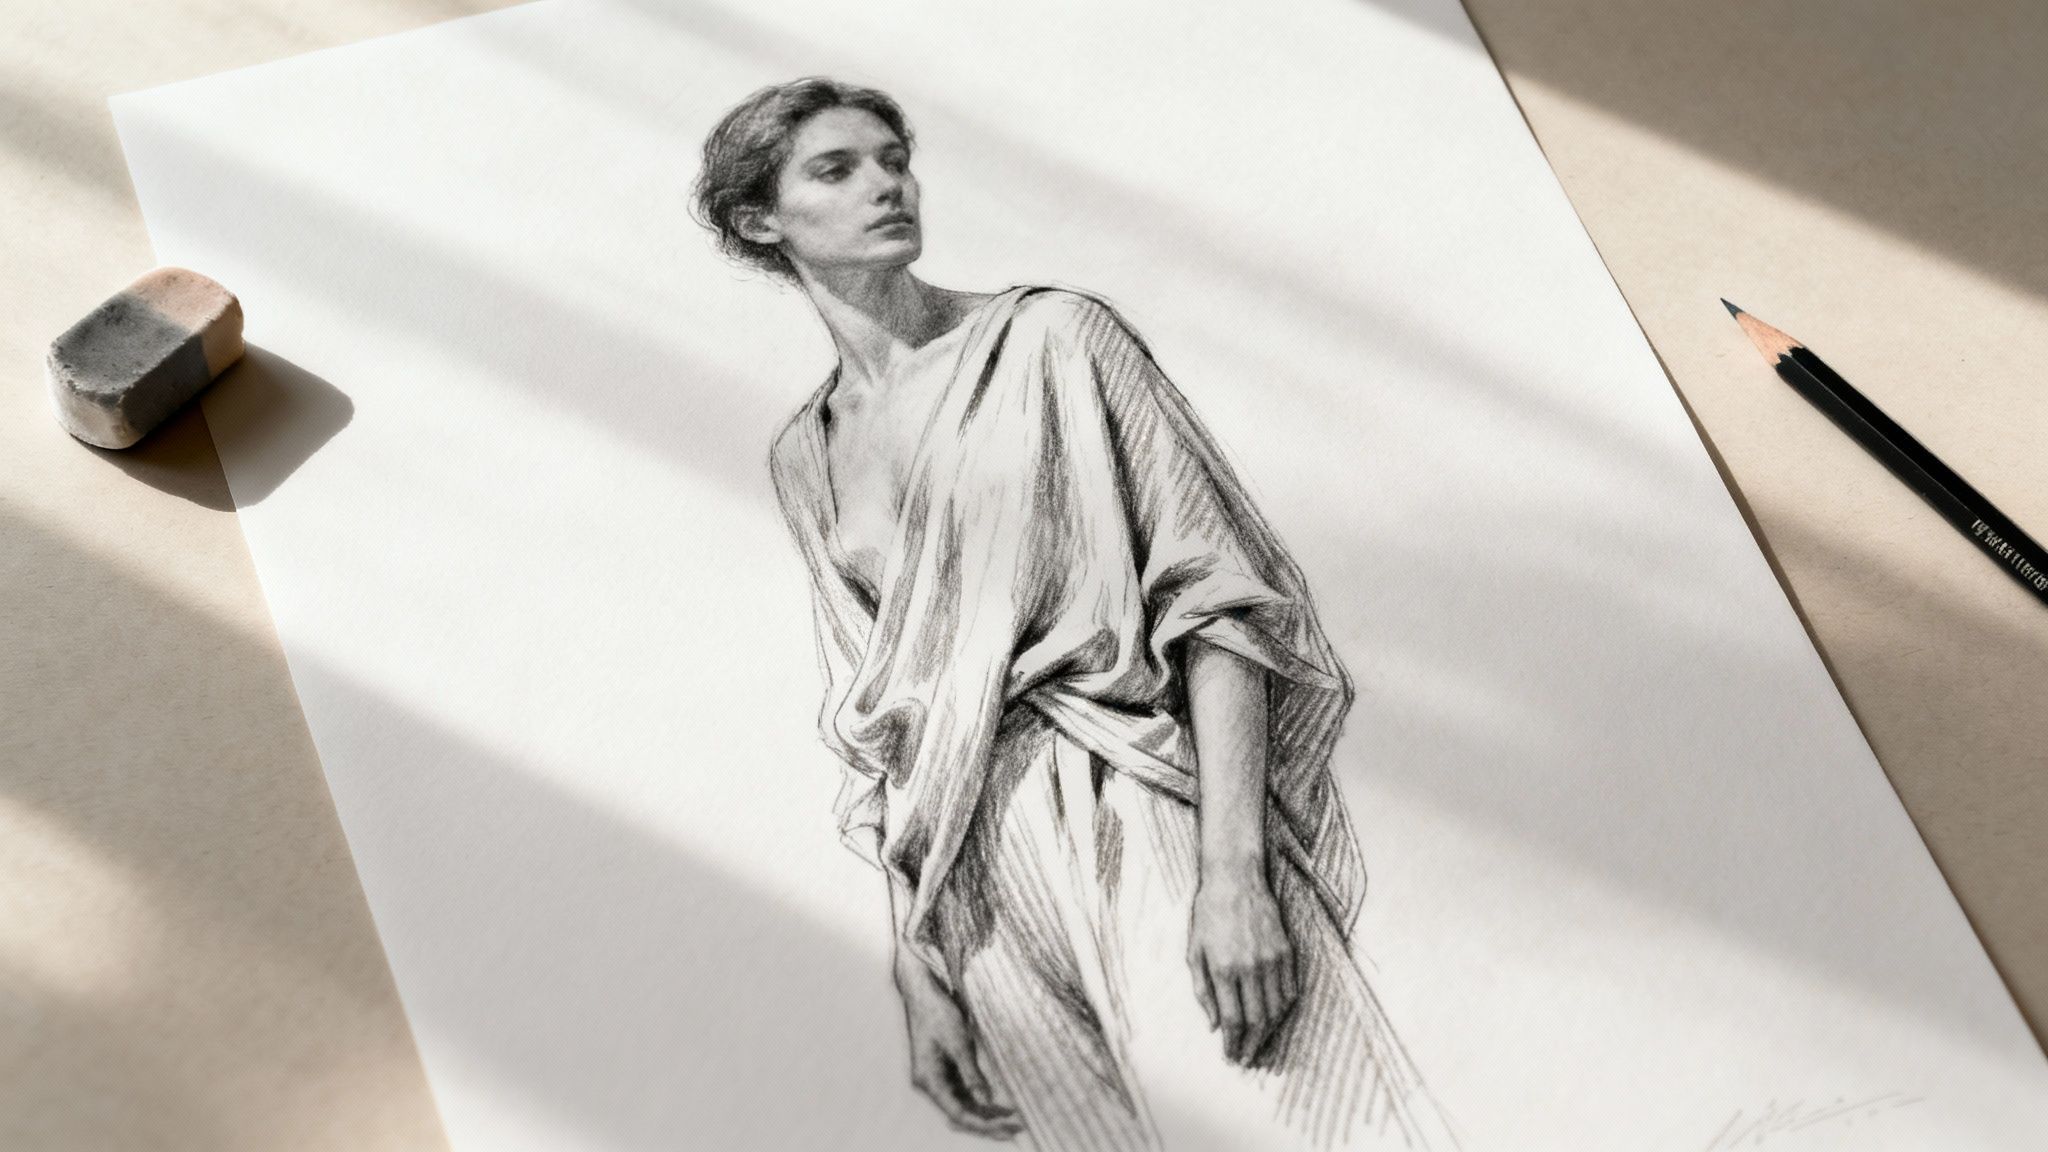
A figure rarely exists in a vacuum. Clothing and shadow are what make it feel truly real and grounded in a scene. Once you've got the underlying form sorted, dressing your figure and adding shading will transform your flat line drawing into something with genuine presence.
This stage is all about understanding two things: how fabric interacts with the body and how light reveals form. Let's break down how to draw clothing that drapes and folds realistically before diving into the fundamentals of shading.
Understanding How Fabric Behaves
Clothing isn't just a pattern you draw over a figure; it's a separate object that’s pulled, stretched, and bunched up by the body beneath it. The key to drawing convincing clothes is to think about gravity and tension points.
Tension points are the places where fabric is supported or stretched, like the shoulders, elbows, and knees. From these points, fabric will hang, bunch, or stretch in predictable ways. A sleeve, for example, will bunch up at a bent elbow and hang loosely from the shoulder. Learning to spot these forces at play is the first real step to mastering drapery.
The most common mistake I see is when artists follow the body's contour too closely, making clothes look like body paint. Instead, think of fabric as hanging from the figure. It creates its own shapes and silhouettes that only hint at the form underneath.
The Seven Types of Fabric Folds
While fabric can seem totally random, most folds fall into one of several key categories. Identifying them gives you a clear system for drawing almost any type of clothing you can imagine.
- Pipe Folds: These are tube-like folds that hang down from a single tension point, like curtains. You'll see them on skirts, capes, or any loose fabric where gravity is the main force.
- Zigzag Folds: When fabric is squashed between two points—like the inside of a bent knee or elbow—it creates this classic back-and-forth zigzag pattern.
- Spiral Folds: These pop up on cylindrical forms like arms and legs, where fabric twists around the limb. Think of the way jeans wrinkle and spiral around a leg.
- Diaper Folds: When fabric is suspended between two points (like a hammock), it creates a sagging, U-shaped fold. You often see this on baggy clothing slung between the hips.
- Drop Folds: This happens when fabric hits a surface and just piles up, creating a cascade of soft, dropping shapes.
- Half-Lock Folds: These are small, interlocking wrinkles that appear when fabric suddenly changes direction over a form, like the back of a bent knee.
- Inert Folds: When fabric is just lying on a surface without any tension, it creates these random, inactive folds.
By recognising these fold types in your references, you can simplify complex drapery into manageable shapes and patterns. It makes the whole process feel less intimidating and your drawings far more believable.
Bringing Your Figure to Life with Shading
Shading is what gives your figure weight and form. It’s the magic that convinces the eye it's looking at something three-dimensional. The entire process hinges on one simple but critical decision.
First, you must establish a single, clear light source. Where is the light coming from? Is it a harsh, direct light from above, like the sun at noon? Or a soft, diffused light from the side, like a window on a cloudy day? This choice dictates where every single shadow on your figure will fall.
Once you’ve decided on a light source, map out your core shadows. These are the areas on your figure that are turned away from the light. Keep them simple at first, blocking them in as large, connected shapes. This helps build a strong sense of form before you get lost in the details.
Finally, you can apply your values using a few classic techniques:
- Hatching: Creating shadows with a series of parallel lines. The closer the lines, the darker the shadow. Simple and effective.
- Cross-Hatching: Layering sets of parallel lines in different directions to build up even darker, richer tones.
- Blending: Using a tool like a blending stump, a bit of paper towel, or even your finger to smooth out graphite for soft, gradual transitions from light to dark.
These techniques are what will give your figures a tangible presence, pulling them right off the page and into the viewer's world.
Practical Exercises to Build Your Drawing Skills
Theory gives you the map, but consistent practice is the journey that actually gets you there. This section is all about rolling up your sleeves and putting pencil to paper. We're going to move from just understanding the techniques to confidently using them through a few focused exercises and mini-projects.
This is where the magic happens. Hands-on application is what truly builds skill and confidence. It’s the point where you start to develop an intuitive feel for how to draw a person, turning abstract knowledge into something you can actually do. The goal here is to make these fundamental principles second nature.
Quick Pose Challenges From Photo References
One of the most powerful ways to improve is through rapid, timed gesture drawing. This exercise trains your eye and hand to capture the essence of a pose in seconds, forcing you to focus on energy and flow rather than getting bogged down in tiny details.
Find a good source of reference photos with people in dynamic poses—dancers, athletes, or even just candid street photography will do the trick. Set a timer and get to work.
- 30-Second Sprints: Your only goal is to capture the line of action. Use a single, flowing line to represent the core energy of the pose. Don't even think about accuracy; just capture the movement.
- Two-Minute Drills: With a bit more time, you can start adding basic forms. Begin with the line of action, then block in the head, ribcage, and pelvis. Use simple shapes like ovals and cylinders for the limbs.
- Five-Minute Studies: Now you can begin to refine the shapes, double-check your proportions, and add a hint of contour. This longer format helps bridge the gap between a quick gesture sketch and a more detailed drawing.
The real benefit of these quick-fire exercises isn't the finished drawings themselves. It's the muscle memory you're building. You're teaching your brain to see the figure as a whole, dynamic entity rather than a collection of separate parts.
Observational Drawing in Everyday Settings
The world around you is a life-drawing class just waiting to happen. Grab your sketchbook and head to a public place like a park, a café, or a bus stop. Drawing people from life is an incredible way to practise capturing natural poses and real-world anatomy.
Your mission is simple: sketch the people you see.
- Focus on posture: Notice how someone’s posture changes when they're reading a book versus checking their phone? Sketch it.
- Capture interactions: Do a quick study of two friends chatting. Pay attention to how they lean in and gesture.
- Study clothing: Observe how fabric drapes on a person sitting on a bench or folds around a bent elbow. This is real-world practice you can't get any other way.
This kind of practice sharpens your observation skills immensely. You’ll start to notice the subtle nuances of body language and movement that make a drawing feel authentic and alive. It's also important to understand how you learn best to get the most out of your practice; you can explore your ideal method by reading our guide on active vs passive learning.
Creating Original Character Studies
Alright, now it's time to apply everything you've learned to create something straight from your imagination. This mini-project involves developing a simple character study based on a prompt.
Prompt Example: Design a character who is a musician getting ready for a street performance.
- Gesture & Pose: Start by sketching several thumbnail poses. Are they nervously tuning their guitar? Confidently slinging it over their shoulder? Pick the pose that best tells their story.
- Proportions & Form: Develop your chosen thumbnail into a larger sketch. Focus on building a solid structure with believable proportions.
- Features & Clothing: Add a face that reflects their personality—is their expression focused or relaxed? Dress them in clothes that fit their character, like worn-out jeans or a favourite jacket.
- Shading & Detail: Finally, add some shading to give your character form and weight, making them feel like a real part of their environment.
This process really solidifies your skills by taking you through every stage of drawing a person from start to finish. Proportions are the backbone of drawing people, and in NZ's vibrant arts landscape, flexible learning is key. The strong public support for the arts shows why online platforms that fit a Kiwi lifestyle are so important.
Beyond just drawing the human form, developing precise line control is valuable across many creative disciplines. If you're looking to branch out, you could also explore the artistry of hand lettering to further refine your artistic precision.
Common Questions About Drawing People
Even with a solid plan in hand, learning to draw people comes with its own set of puzzles. It's completely normal to hit a few sticking points, so let's tackle some of the most common questions that pop up for artists just starting out.
Think of this as a bit of friendly advice to push through those challenges and keep your creative momentum going. Every artist, no matter how skilled, has been in your shoes and asked these exact same things.
What Are the Best Pencils and Paper for Figure Drawing?
You really don't need a huge arsenal of expensive supplies to get going. In fact, keeping your kit simple is often the best way to start. For beginners, a basic set of graphite pencils and a decent sketchbook are all you need to make real progress.
Here’s a great starting point:
- Pencils: Grab a small range from 2H to 6B. The hard 2H is perfect for those light initial sketches, a standard HB is your workhorse for general linework, and the soft 6B is fantastic for laying down deep, rich shadows.
- Paper: Look for a sketchbook with paper around 120gsm (grams per square metre). That thickness is sturdy enough to handle a bit of erasing without tearing up, which gives you more freedom to experiment and make mistakes.
Ultimately, your focus should be on technique and practice, not fancy gear. You can create incredible drawings with the simplest of tools.
How Can I Make My Drawings Look Less Stiff?
This is probably the number one frustration for aspiring figure artists, and the solution is almost always the same: start with gesture. Stiffness creeps in when you jump straight to drawing static outlines before you've captured the energy of the pose.
Before you even think about a single detail, spend just 30-60 seconds capturing the line of action. This is a single, flowing line that traces the main energy and movement of the pose. By prioritising this rhythm and flow first, you train your brain to see the figure as a dynamic, living thing. This one simple habit will make your drawings feel more alive and less like rigid statues.
My Proportions Are Always Wrong—What Is the Most Common Mistake?
The single biggest mistake I see in figure drawing is making the head too large for the body. The average adult is about 7.5 heads tall, but beginners often draw the head closer to one-fifth or one-sixth of the total height. That one error throws everything else off from the start.
To fix this instantly, always begin by lightly sketching the oval shape of the head. Then, use its height as your unit of measurement to block out the rest of the body before adding any details. This simple check will immediately and dramatically improve your proportions.
How Long Does It Take to Get Good at Drawing People?
There's no magic number here. Your progress is tied directly to how often and how thoughtfully you practise. It’s a journey, not a race, and everyone finds their own pace.
That said, with consistent and focused effort—even just 30 minutes a few times a week—most people see a huge improvement in their confidence and skill within a few months. The key is to concentrate on the fundamentals like proportion and gesture, rather than getting bogged down by the finer details too early on.
At Prac Skills NZ, we believe learning practical skills should fit into your life, not the other way around. Our online courses are designed for busy Kiwis who want to build their passions and careers with down-to-earth, relevant knowledge. Explore our range of creative arts courses and start your journey today at https://www.pracskills.co.nz.
